|
This is where the fun starts and you can actually see the shape of your canoe starting to form. To shape the sides of the canoe you bend the edges of the bark upwards and hold it in place with stakes. In order to get thick bark to bend, you must pour lots of hot water on it. I boiled up a big pot of water on the stove and brought it outside and ladled it over the bark. It immediately softens the bark so you can bend it carefully. Of course the day I picked to do this it was 35 degrees Celsius outside! any time you are shaping or bending bark, make sure you use lots of hot water or it will crack and tear.
 The
main piece of bark I had was only slightly wider than the form itself in the
center. This meant I had to add extra panels of bark on the sides. This is common
when you build a birchbark canoe as it is rare nowdays to find a birch tree
that is big enough around for a complete canoe.
The
main piece of bark I had was only slightly wider than the form itself in the
center. This meant I had to add extra panels of bark on the sides. This is common
when you build a birchbark canoe as it is rare nowdays to find a birch tree
that is big enough around for a complete canoe.
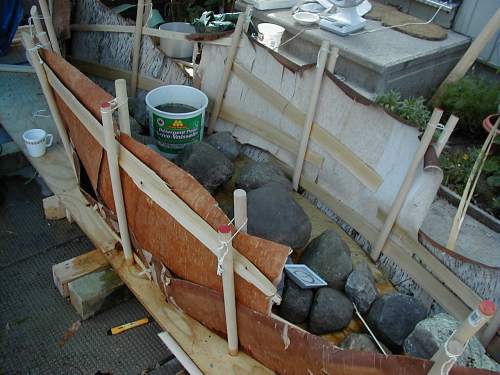
In the picture (click on it to see it bigger) you can see the main piece of bark bent upwards and held in place by the stakes in holes in the building platform. For each stake there is a matching stake on the inside that is wedged against the form at the bottom and tied to the outer stake at the top. You can see where I have added extra pieces of bark as needed on the sides. I have used scrap strips of cedar to hold the bark in place.
You will find as you bend your back upwards that it does not make the right shape for a canoe. You have to cut gores in it to shape it properly. Sewers will recognize these as darts. They are vertical cuts in the bark. I made about 4 in each side (I think). Once the gores are cut, you overlap the bark and it makes a nice rounded shape. The bark should be overlapped so that the piece towards the bow is outside of the piece towards the stern so that water will not be forced into the crack when you paddle. I also found some nasty weak holes in my bark so I decided to patch them with extra pieces too. Then the bark on one end tore off so I had to add another piece on one end too.
 Now
that your canoe consists of a bunch of pieces of bark with holes cut in them
you have to start sewing them together. It's kind of like making a patchwork
quilt. The sewing is done with split spruce root. Each hole is made first with
an awl. You must sew a seam to join each piece of extra bark and to close up
the gores as well.
Now
that your canoe consists of a bunch of pieces of bark with holes cut in them
you have to start sewing them together. It's kind of like making a patchwork
quilt. The sewing is done with split spruce root. Each hole is made first with
an awl. You must sew a seam to join each piece of extra bark and to close up
the gores as well.
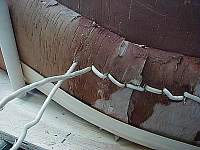
Sewing extra bark panels on uses a kind of double running stitch. Take a long piece of root, make a hole in the two layers of bark at one end of the where you want the seam to be and thread the root though the hole until it's halfway through. Then make holes along the seam, about 1/2 to 1 inch apart. Thread both ends of the root through each hole and tighten it. You will end up with a nice continuous line of stitching on the inside and outside of the canoe. Well, mine was none too neat but it worked. I sewed the gores by making long stitches across the seam. I don't have a good picture of this.
While I was sewing and sewing and sewing (about 8 hours of work) various neighbours came by to see what I was doing. No-one believed that my canoe would ever float, including me!
Back to Building a birchbark canoe
On to Inwales and outwales
© Judy Kavanagh 2001